 Chat with us on WhatsApp


Guide Assemble Bar Stool
Learning how to assemble a bar stool correctly helps the stool feel stable, adjust properly, and sit safely at the right height for everyday use. Most gas lift and swivel bar stools arrive flat-packed, with the main parts separated for delivery: the base, gas lift column, footrest or support stem, seat mechanism, and seat pad.
Assembly is usually straightforward and takes around 5–15 minutes per stool. The most important detail is to remove the protective plastic cap from the gas lift before fitting the seat. If this cap stays in place, the stool may not raise or lower correctly. This guide focuses on practical bar stool assembly, basic dismantling, and the checks that help avoid avoidable movement, wobble, or height problems.
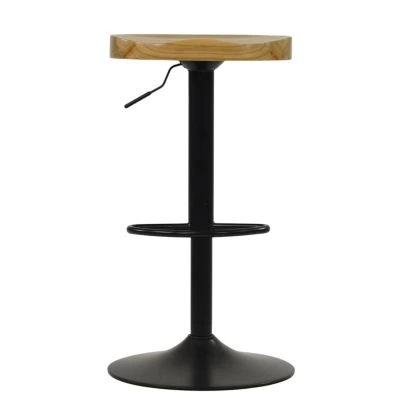
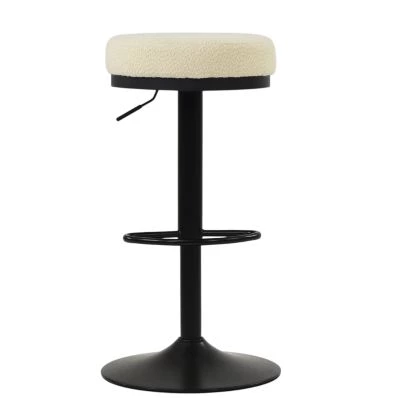
Parts Usually Supplied With a Gas Lift Bar Stool
Most gas lift bar stools include a small number of large parts rather than complex fittings. Check everything before starting, especially if you are assembling more than one stool.
- Seat pad or seat shell
- Seat mechanism or swivel plate
- Gas lift cylinder
- Protective plastic cap on the gas lift
- Base plate or trumpet base
- Footrest or support stem, if supplied separately
- Bolts, washers, and Allen key
Lay the parts on a soft surface to protect the seat and finish. Avoid forcing any part into place before checking the order of assembly.
Tools Needed to Assemble a Bar Stool
Most bar stools only need the Allen key supplied in the box. Some designs may also need a Phillips screwdriver, but this is less common for simple gas lift stools.
- Allen key, usually included
- Soft cloth or towel to protect the seat
- Phillips screwdriver, if required by the product instructions
- Rubber mallet, only for dismantling or loosening tight parts
Do not use power tools unless the product instructions say it is safe. Over-tightening can damage fixings or pull threaded inserts out of the seat frame.
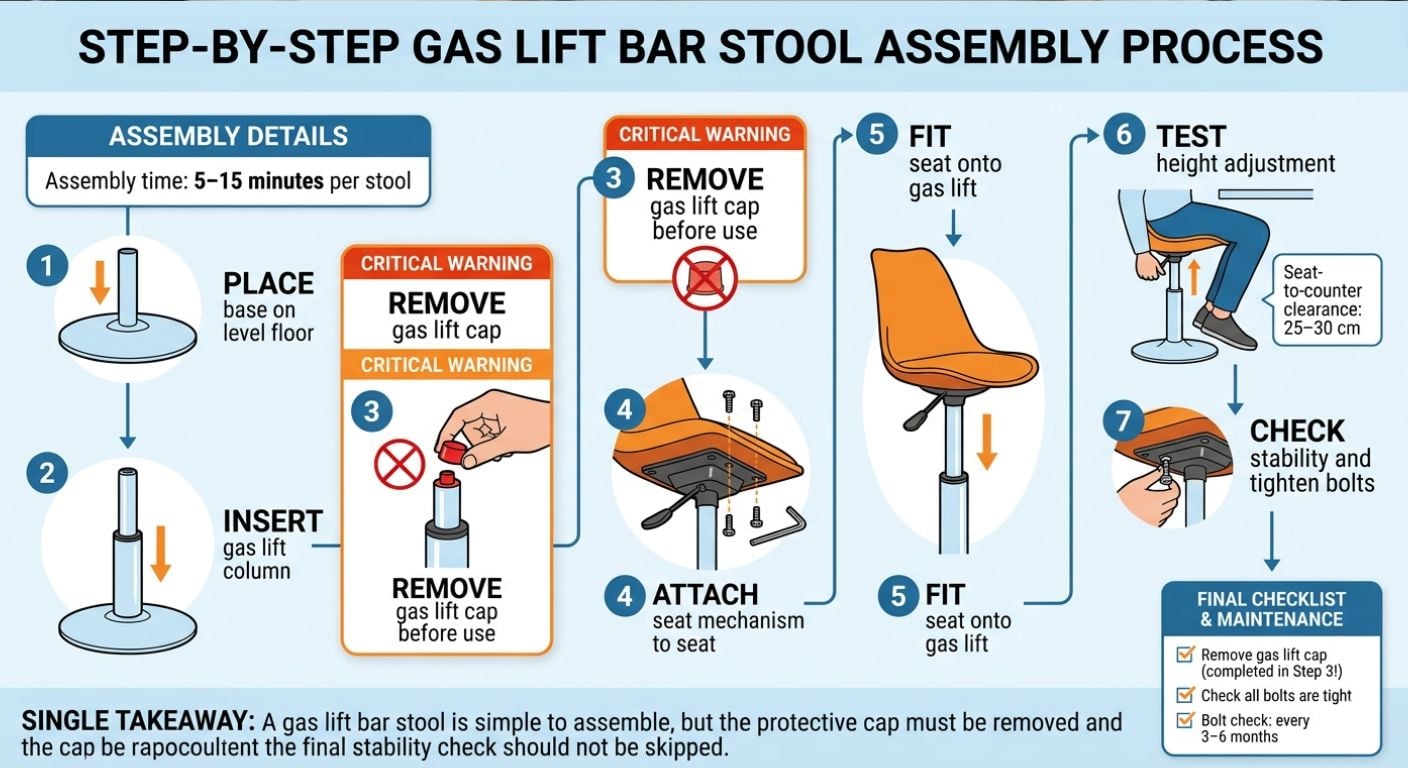
Step-by-Step Bar Stool Assembly Instructions
1. Place the Base on a Level Floor
Start with the base on a flat, stable surface. If the base has a protective ring underneath, check it is seated evenly before continuing. This helps protect the floor and reduces rocking once the stool is assembled.
For a trumpet base, the wider side sits on the floor. The central hole should face upwards, ready for the gas lift column.
2. Insert the Gas Lift Column
Place the wider end of the gas lift into the centre of the base. It should sit vertically without being forced. Most gas lift columns use pressure and body weight to lock securely into place, so they do not usually need screws at this stage.
Check that the column is straight before moving to the next step. If it leans at this point, remove it and re-seat it in the base.
3. Remove the Protective Plastic Cap
Remove the small plastic cap from the top of the gas lift before fitting the seat. This cap is usually black, orange, or clear. Leaving it on is one of the most common reasons a new gas lift bar stool will not adjust properly.
The cap is there to protect the gas lift during transport. It is not part of the working mechanism and should not remain in place during use.
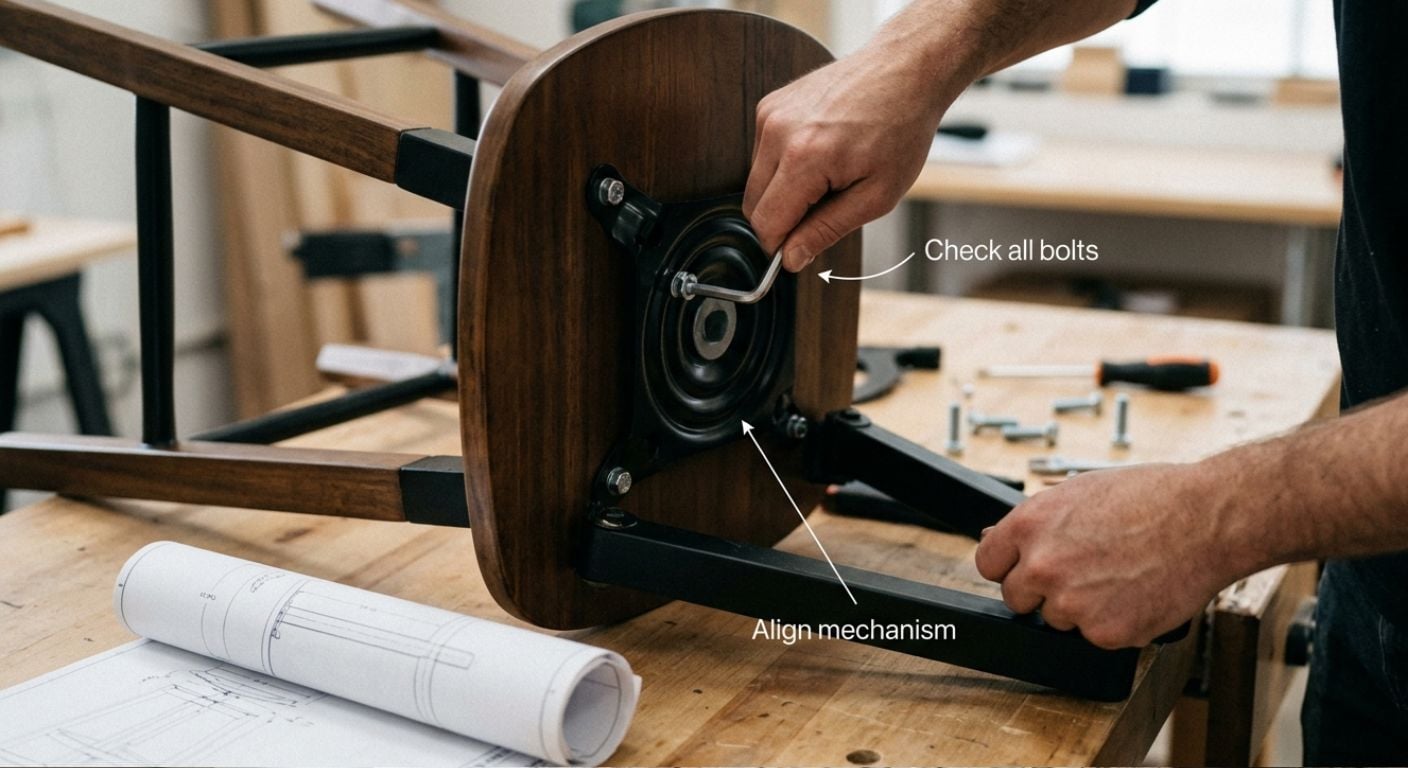
4. Attach the Seat Mechanism to the Seat
Turn the seat upside down on a towel or soft surface. Line up the holes in the seat mechanism or swivel plate with the holes underneath the seat.
Insert all bolts loosely first. Once every bolt is aligned, tighten them gradually in a cross pattern. This keeps the mechanism level and helps prevent uneven pressure on one side.
The question we hear most from our customers is whether a stool is faulty when it will not lift, but the cause is often the protective cap being left on during assembly.
5. Fit the Seat Onto the Gas Lift
Lift the assembled seat and lower it onto the top of the gas lift column. Make sure it sits centrally. Once it is in position, sit on the stool carefully to let body weight secure the tapered connection.
Do not hammer the seat into place. The connection tightens naturally through downward pressure.
6. Test the Height Adjustment
Use the lever under the seat to raise and lower the stool. The stool should rise when there is little or no weight on the seat and lower when someone is seated while pulling the lever.
If the stool does not move, check again that the protective cap has been removed from the gas lift.
7. Check Stability Before Use
Place the stool on a level floor and check for movement. Tighten the seat bolts again if needed. A slight settling period is normal after first assembly, especially once the stool has been sat on a few times.
How Long Does Bar Stool Assembly Take?
Most bar stool assembly takes around 5–15 minutes per stool. Simple gas lift models are usually quicker, while stools with separate footrests, arms, or more complex seat mechanisms may take longer.
If you are assembling a set of two or four stools, assemble the first one carefully before repeating the process. This reduces mistakes and makes the remaining stools faster to complete.

Height Checks After Assembly
Once assembled, check that the stool works with your counter or breakfast bar height. A useful rule is to leave around 25–30 cm between the top of the seat and the underside of the counter.
This gives enough space for sitting comfortably without the stool feeling too low. For more detailed sizing guidance, read our breakfast bar stool height guide.
How to Dismantle a Bar Stool
To dismantle a gas lift bar stool, remove the seat from the gas lift column first, then separate the gas lift from the base. These parts can become tight because they are pressure-fitted during use.
- Turn the stool upside down on a protected surface.
- Remove the bolts holding the seat mechanism to the seat, if needed.
- Hold the base securely and gently tap around the gas lift connection using a rubber mallet.
- Apply a small amount of lubricant around the joint if the column is stuck.
- Work slowly and avoid striking chrome or painted parts directly.
Dismantling is usually harder than assembly because the tapered gas lift connection tightens with use. Do not use excessive force, as this can mark the finish or bend the mechanism.
Common Assembly Problems
Why Is My Gas Lift Bar Stool Not Going Up or Down?
The most common reason is that the protective plastic cap has not been removed from the gas lift cylinder. Remove the seat, check the top of the gas lift, and take off the cap before refitting the seat.
Why Does My Bar Stool Feel Wobbly?
A new bar stool may feel wobbly if the seat bolts are not tightened evenly or the gas lift is not seated correctly in the base. Re-check the bolts, make sure the floor is level, and confirm the column sits straight.
If the wobble continues after assembly, see our guide on how to fix a wobbly bar stool.
Why Is the Seat Not Sitting Straight?
The seat mechanism may have been tightened unevenly. Loosen the bolts slightly, realign the plate, then tighten each bolt gradually. Avoid fully tightening one bolt before the others are in place.
Why Is the Stool Squeaking After Assembly?
Squeaking is usually caused by movement between fixings or contact points. Check that all bolts are secure and that the seat mechanism is properly aligned. For more detail, read our guide on fixing a squeaking bar stool.
Safety Checks Before Regular Use
Before using the stool every day, check that the base is stable, the seat is secure, and the gas lift adjusts smoothly. The UK Government’s product safety guidance for businesses explains why safe product use and clear instructions matter for household goods.
- Check all bolts are tight but not over-tightened.
- Make sure the gas lift cap has been removed.
- Confirm the stool sits flat on the floor.
- Test the height lever before regular use.
- Do not stand on the stool or use it as a step ladder.
Re-tighten bolts every 3–6 months, especially if the stool is used daily. Small movements over time can loosen fittings.
When Self-Assembly Makes Sense
Self-assembly makes sense when the stool has a simple gas lift or swivel structure and the supplied fittings are complete. It keeps delivery practical and allows large items such as bar stools to arrive safely in manageable packaging.
It may not suit buyers who cannot lift the seat section safely, do not have enough space to lay the parts out, or are assembling a large number of stools for commercial use. In those cases, assembly help may be worth arranging before delivery.
FAQs
Do Bar Stools Come Assembled in the UK?
Most bar stools sold online in the UK arrive flat-packed or partly assembled for safer delivery. Gas lift stools usually need the base, gas lift, and seat section fitted together at home.
Can One Person Assemble a Bar Stool?
Yes, most simple bar stools can be assembled by one person. A second person can help when lining up larger seats, protecting upholstery, or assembling several stools at once.
Should I Keep the Plastic Cap From the Gas Lift?
No. The plastic cap protects the gas lift during transport and should be removed before the seat is fitted. Keeping it on can stop the stool from raising or lowering correctly.
How Often Should I Check the Bolts?
Check the bolts after the first few uses, then every 3–6 months. Daily use can loosen fixings over time, so regular checks help keep the stool stable.
Can I Take a Gas Lift Bar Stool Apart for Moving?
Yes, but dismantling can be harder than assembly because the pressure-fitted parts tighten with use. Use a rubber mallet carefully and protect visible metal or painted surfaces from marks.


Final Takeaway
Correct bar stool assembly is mainly about fitting the parts in the right order, removing the gas lift cap, and checking the stool before regular use. Most problems come from skipped steps rather than complex faults.
Once assembled, check the stool height against your counter and leave around 25–30 cm of clearance between the seat and the underside of the surface. For sizing decisions, use the full breakfast bar stool height guide alongside the product measurements.


Comments